Tuesday, August 9, 2011

Stationery: pens & pencil tin

This idea was actually given by a friend who did it to her pens, and I think it's such a simple but brilliant idea. So much so that almost all my pens look like that now.

A really cheap and easy way to decorate your pens!

Basically you just grab a magazine (I use IKEA's, 'cause they always have such nice prints), flip through to find some nice patterns, and cut out rectangular pieces of them, roughly estimating the length and width need to wrap it around the ink stem. For the pens that I use (Pilot G-Tec, pictured), it has to be magazine paper in particular, 'cause only magazine paper is thin enough to be inserted.


Take out the ink stem from the pen, wrap the slip of magazine paper tightly around the ink stem, and carefully insert it back into the pen. And that's it, you have a cute new pen! Simple and environmentally-friendly isn't it? Because you're using magazines you've read. And also because the pens are so pretty, you'd rather buy refills than a new pen. You can even regularly change the design of your pen, simply by taking out the slip of paper!

And this is my newly decorated pencil tin:

I bought a plain black pencil tin when I was in Osaka. It came with silver alphabet stickers for me to decorate it with, but while shopping on another day, I came upon the stickers section in a departmental store, and I saw these alphabet stickers in colored crayon font, and I knew I had to use them for my new pencil tin. I even grabbed the hiragana (japanese alphabet) version of the stickers, which I have yet to use. It took a while to come up with the quote, given that there are only 5 of each alphabet, in particular the vowels. But this is what I came up with, and I am pretty pleased :D

Monday, June 27, 2011

Tea party: mustache party favors

These cute mustaches were also adapted from Paper + Craft by Minhee and Truman Cho! The idea was originally for drink toppers, but I decided to stick them to satay sticks instead and they made for interesting props for photos at the party (:


The templates for the mustaches can be found here


An assortment of shapes and sizes

Tea party: flowers

Also adapted from Paper + Craft by Minhee and Truman Cho, these flowers were adapted from a template meant for making flower clip-ons for shoes. The template can be found here.

I traced out the template onto tracing paper, and cut dozens of pieces out from stock paper. And stuck them practically everywhere...like on my guestbook (above).

And made flower chains with them.

Basically, after cutting out 4 different sizes of the template, use a pencil and curl the petals of the flowers by rolling the pencil into the paper. Then glue the 4 different pieces together and voila, a flower is formed! Simple craft. The cutting of the pieces can be pretty tedious though.

Tea party: paper flower balls

Easy-to-make tissue paper flower balls! Adapted from the book Paper + Craft by Minhee and Truman Cho

Materials: tissue paper, wire, thread, scissors
You can experiment with the type of paper used actually. In this case I mixed patterned paper with plain colored ones. You could try crepe paper as well.

For the bigger flower ball, stack 8 sheets of 21cm x 30.5cm tissue paper together and fold in 3cm accordion folds. Trim the edges (either pointy or rounded). Tie the center with wire. Loop thread with wire and leave it long enough to hang from the ceiling. Carefully separate each tissue layer, pulling each layer away from the center until they form ball-like shapes.

For the smaller flower balls, the tissue paper should be cut into rectangles 13cm x 15cm. The book says each ball requires 4 rectangles of tissue paper stacked together, but after experimenting I find the flower balls look prettier with 5 sheets, like the one above.

This one is made with 5 sheets of tissue paper too.

This one's made with 4 sheets.

Budget-friendly and pretty-looking decorations for a party (;

Tea party: invitation cards

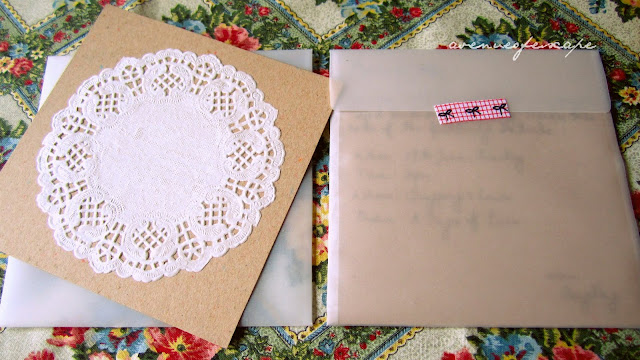
So I decided to make some invitation cards for my 21st birthday tea party

Materials: paper doilies, patterned brown paper, tracing paper, patterned fabric tape (or washi tape), marker


Easy DIY - The cards were really easy to make. I cut the brown paper into 14 cm squares, stuck the paper doily onto the card and it's done! And it looks pretty 'cause of the paper doily pattern. 

I'm in love with paper doilies; I think they make everything look nicer. Like when you use it as bases for cakes and tarts. It took me a long while to hunt down the paper doilies though, I couldn't seem to find them anywhere?! I found some at Daiso, but they only came in one size (for cakes), which was too big for my purposes. Finally found these in a small neighbourhood shop selling utensils and crockery.


The envelopes were a little tricky though. I wanted the cards to fit them exactly, so it took a little while to figure out how much margin to leave, and how to fold and cut them. Initially I also wanted the names of my friends to be printed on the tracing paper, in typewriter font; I think that would have been cute. But I didn't have a laser printer, and my printer isn't tracing paper-friendly, so I ended up having to write their names on the envelopes with a marker.

And the fabric tape is for sealing the envelope (:

Thursday, May 5, 2011

i need some inspiration!


been horribly uninspired lately, and that is not a good thing. why? because i have so many 21st birthdays coming up on my calendar! i want to make stuff, but i can't seem to come up with any new good ideas ): mostly i think of things i've done before, which makes it boring, no?

the other day i scoured spotlight as i waited for rjo, staring hard at all the craft materials and willing them to just somehow mix themselves in an imaginary cauldron in my mind and form something, but nope, nothing came out of it.

SIGHHH. if anyone has any good ideas, i'll be glad to hear them.

Bracelet: all things nice.

This was made for one of my closest girlfriends, who's turning 21 on May 7th. She flew back from brisbane (where she's studying) to celebrate it in advance with us during her Easter break (:

Charms of all things nice (:

Key, heels, teapot

Rocking horse, slippers, bag

Favourite time of the day (:

Pretty slippers charm

Packaging!

Packaging inside the packaging


my wish for you is that this life becomes all that you want it to

your dreams stay big, your worries stay small

Laptop case: sanrio characters

Cute laptop case and matching pouch for my charger!

This was made sometime back in January actually, by mummy dearest (: I came up with the idea and chose the fabric and matching red zip. The red drawstring of the charger pouch is ripped off some random paperbag I had...you recycle what you can. Also, the laptop case has sponge padding and black lining inside...like you know, a real laptop case. I mean, it is a real laptop case.

Close-up of the adorable fabric. Apparently it was imported from Japan, and it cost me $30/m (read: EXPENSIVE) But looking at it makes me happy, so I suppose it's worth it, since I've been bringing my laptop around everyday, and I take naps on it during lectures.

My macbook sitting happily on the desk with its new cover on.

Oh and this was my tidied and re-decorated desk! Back in March. Months have passed and it no longer looks as neat...and those are cork/wood coasters stuck on the walls as decoration in an attempt to be y'know, quirky. And also an attempt to make use of some of the useless things I buy and chuck somewhere. The coasters were picked up at a school bazaar a long time ago.

Wednesday, January 12, 2011

Handmade christmas cards

This post is way overdue. But I was so busy with making various things during the holidays that I didn't have time to do a proper post of everything I made. I'll post the other stuff soon. But for now, x'mas cards I made for friends~


The x'mas cards on sale this christmas were not to my taste, so I decided to make some myself. I made a total of only 9 cards in 2 days, from the limited scrap materials and cut-outs at hand...so not everyone on my usual x'mas card list received handmade cards. I'll do better next year.

Happy snowman (:

Santa love ♥

Gingerbread men!

Love under the mistletoe ♥ - I know the leaves don't look really like mistletoe...but this was the best I could find S: I'm quite proud of the red mistletoe-like beads though haha


Christmas present - I tried to copy the font of the wrapper of a present featured in a christmas catalogue.

Nutcracker ♥

Loved ones - attempted to create a snowy effect with silver beads and white sequins

Christmas bells

Frosty the snowman

Materials:
The cute pictures/graphics were cut out from magazines and Christmas promotions brochures handed out on the street. I love recycling stuff like that. The cards were made from stock paper, and other materials like sequins, beads, foam/sticker alphabets are from my own collection of craft materials.