Wednesday, October 31, 2012

Bake: cookies&cream cupcakes

So, for a heartfelt thank-you gift I decided to bake some cupcakes (o^-^o)

 
Dry ingredients mixed

All ingredients mixed


The first batch that came out burnt...I stupidly thought 350 degrees meant degrees celsius. Vaguely wondered why my (small) oven's limit was only 250 degree c, and proceeded to bake the cupcakes even longer, to make up for the lower temperature... (-_-") I think from that you can surmise just how infrequently I bake.

Second attempt, before they went into the oven

Cupcakes with frosting - the second batch came out fine, so I proceeded to frost them. This was when the icing tip was still working

After two batches the icing tip decided to rebel and I ended up with weird-looking icing (see cupcake on left)

In the end I gave up and just lathered on the icing and smoothed it over with the back of a spoon and planted oreos on top

The baking itself didn't take that long, but the washing up took foreverrr.

Still, it was fun. Provided some late-night stress relief from all the studying and assignment deadlines. I have a mind to make whoppers brownies next. And a whole long to-bake list that is constantly growing...

Recipe: bakerella

Crochet: beanie & beret #2

Another baby beanie I made for the same baby girl - this one's for 3-6 months

I love crochet flowers.

All these crochet hat patterns can be found online (links below). And I'm really envious of all these talented people who are not only good at crafting, they're also good at coming up with patterns and being so generous and big-hearted enough to share them for free. They sell them as well, but I'm a poor student, so I'm really grateful for these free craft ideas ( ; __ ; )

Another beret for another friend - this time cream-coloured, as requested by her

I always have a hard time choosing craft materials because I just feel like buying the entire store every time I step in. So the other day when I went on an impromptu trip to town to buy wool it took quite a while, 'cause I couldn't decide what colours I wanted.

Said pretty friend wearing the beret!

Patterns: baby beanie | beret

Sunday, October 21, 2012

Crochet: beanie & beret

Crochet beanie with flower that I made as a baby shower gift

Red beret as a birthday present for a girlfriend

Patterns: baby beanie | beret

Wednesday, August 15, 2012

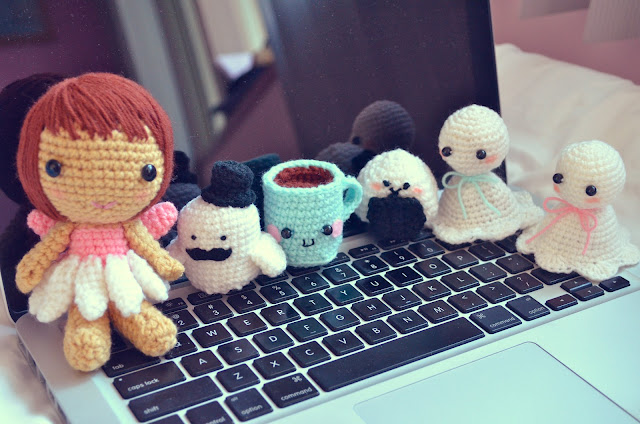
Amigurumi critters!


Craft project this summer holidays was to learn how to make amigurumi! It started with sis needing to learn a craft for her NYAA project. I was bored and I had wool, so the two of us started hunting down all the free amigurumi and crochet patterns online, and began slowly amassing an amigurumi army...

Teru teru bozu! Aka 晴天娃娃 - traditional japanese amulet hung outside windows to bring sunshine and fair weather (^-^)

Random mug of coffee

Mr. Chic
Combined two amigurumi patterns for this critter. It suddenly popped into my mind that I wanted a bird with a moustache and a top hat, so after completing the bird I sourced around for a top hat pattern that could fit. The moustache was cut from felt and sewn on. The eyes were french-knotted (so complicated I had to watch the youtube tutorial several times).

Little pink flower fairy!
By far the most complicated; there were so many parts to her and I had to learn different kinds of crochet stitches to get her arms and legs right. The hair took quite a while too; I didn't want her to have any bald spots. My mum unkindly said that she looks a little retarded 'cause her eyes are too widely spaced apart and I have to agree. But she's still a darling.

Onigiri!
This was actually the first amigurumi I tried my hand at, but the poor onigiri actually turned out more round than triangular, and I had to try and mould it into shape with my hands (-_-")

Teru teru bozu and flower fairy say hi!

Sunday, January 22, 2012

Christmas-themed thank-you cards

It's been a while. These were thank-you cards I made for my mentors and buddies and a few other lawyers at the firm where I interned at. I enjoyed myself and learnt a lot, hence I felt the need to express my gratitude for their warm welcomes. As you can probably tell from the designs of the cards, it was around christmas time last year.


Key material for a simple and quick way to make nice-looking cards: fancy stock paper. These were all the materials I used for the cards: stock paper, foil chipboard alphabet stickers and a bit of brown paper (not pictured). For the stock paper it'd be good if you use ones which are patterned on both sides, so the inside of the card looks nice as well.

Cut half a piece of stock paper and fold it into half, free-hand cut a rectangle of brown paper and stick it on with glue, paste the alphabet stickers and voila! Nice-looking card is done. Great for when you need to make many at once. It's still handmade and heartfelt (:

I loved the funky christmas trees pattern. I'm all for cute (:

This was cute too, but it had a slightly vintage feel to it

Mistletoe (: